Total Pageviews

Thursday, June 21, 2012

What?! What?! In The...


Containers.  Get your mind out of the gutter all you Tosh.0 fans.  Alright, I know I've fallen down hard on blogging lately, but I'm back from vacation and caught up on all the life stuff so back to it!  This post is the last round of veggie plantings I did right before going on vacation during the last week of May so I can tell you now how they're doing, and I also did some updates on the other containers I planted earlier in the season.

Fairy Tale Eggplant from Burpee
Fairy Tale Eggplant.  This is an eggplant variety I got from Burpee that is made for containers.  It's a smaller marbled eggplant.  I did a very basic planting on this one with rocks in the bottom layer for proper drainage and potting soil.  I also have a black beauty eggplant (the classic large dark purple variety) growing in the raised garden bed so I'm excited to compare the two throughout the summer.  This week I checked and the container has these beautiful purple and white blooms on it so it's going strong!  Actually doing better than the black beauty plant, which has grown but has no buds yet.

Peppers in a Gardener's grow bag
Peppers.  Alright, next up is my peppers!  As you know, I started these bad boys from seeds, they're the only thing I did from seed this year that wasn't simple "sow in ground" and needed to be started in advance of growing season.  One is a mildly hot pepper, the other is a sweet pepper.  Sadly, due to lack of a proper labeling at the seedling stage, I have no idea which one is which.  The idea was that I'd have the hot pepper in the red grow bag and the sweet pepper in the blue grow bag.  Once they start growing actual peppers I'll find out if my guess was right or not!  Generally the hot pepper plants are smaller so I did my guess based on which set of seedlings looked larger overall.  As you can see, for these guys I tried a Gardener's grow bag.  They're about $10 each, can be reused for 2 seasons, and are supposed to provide the perfect amount of moisture retention and aeration for the roots.  Very easy to use and keep their shape pretty well.  The main difference in these is you're supposed to use pre-moistened dirt while filling it.  I just filled and watered the dirt as I went every couple of inches.  We shall see.  The plants are about a month in so far and to be honest, the peppers in the back yard are doing better.  These are doing fine, but no buds yet and the backyard most are budding.  This weekend I'm going to try adding more dirt to them since I think with the watering they're planted a bit shallow now. 

Sweet Potatoes in a Gardener's grow bag
Sweet Potatoes.  Alas, the piece de resistance, my sweet potatoes!  I have high hopes for these bad boys because a) they were expensive since you have to buy tubers, and b) potatoes store really well so I could feast all year round!  As you can see, I did another grow bag for these, it's much larger than the pepper grow bag and is designed for potatoes.  I planted 7 tubers here, and a few in the backyard as well for comparison.  They look quite withered and dying here, but no worries, the directions ensured me that no matter how gross/stinky they are when you get them, they bounce back very quickly once planted.  They insist that you put one tuber in a soda bottle with water inside to see the pretty foliage grow from it...but alas, I was running behind on packing so I neglected to do that.  So far, about a month out from planting now, it appears that only 3 of the tubers really survived in the grow bag.  They're growing, but not much, so I'm imagining my sweet potato project may be a failure.  I've been told they only grow in hotter climates than mine, but the Baltimore/DC area is pretty darn disgusting in the summer so I disregarded the online naysayers.  It's over 100 degrees here today!  I may attempt to move the bag to my driveway to do some real spud frying heat of the bag, but we'll see.
Carrots and Onions!  Looking Good!

Update on Carrots and Onions.  Looking good right?  I'm fairly certain I need to thin the carrots out, but I have yet to research how.  So they may come up all scary and deformed looking.  I'm going to try to check in on them this weekend. 

Peas-pretty much done for this round
Update on Peas-In-A-Pot.  Well they've been in the pot for a while now and in this picture from the beginning of June they are starting to turn yellow and stop producing.  Truth be told, they produced a decent number of pods for one person for snacking but it's not like you could make a meal out of them.  And according to smart gardener its time to plant another pot full peas, so I guess they only produce for a month or so and you keep replanting like lettuce.  Sadly, I may have/did leave the seeds out in the yard and ruined them.  A week after this picture was taken the pot was totally dead.


Strawberries-a little dry on the bottom row
Update on Strawberries.  Well the lazy strategy isn't working out so well.  The plants on the bottom are drying out a lot no matter how often I water them so I've been reduced to using watering bulbs just to try to get water to them.  It seems to be working okay but is far more of a pain in the arse to refill every couple days than if I'd just created the PVC pipe with holes in the center so that water would easily travel down to them.  So alas, laziness did not pay off in the end.


That's all for today folks!  I'm going to try to start doing side by sides of container plants with their garden bed counterparts to show the comparison in how well they're doing.

Tuesday, June 5, 2012

Wet N Wild


One new thing I'm trying this year is an attempt to take watering out of the garden failure equation.  Last year I definitely killed many plants during the drought by failing to water them often enough.  The best time to water plants is in the morning so they get the water before the soil gets too hot so it doesn't all evaporate before getting to the roots.  At night the opposite problem occurs and it's too cold to evaporate all the water sitting on the plant or the base of the roots, which leads to root rot and mold or mildew.  Of course during a true heat wave you should water your plants every day or at least every other day, but taking the extra 15 minutes in the morning when I have to leave for work at 7:00 AM did not happen.

Watering timer.
Soaker hose packaging.
The project this year started when I got a water timer for my spigot.  I had planned to connect the timer to basic sprinklers but realized for my patio garden I'd also be watering my patio furniture cushions; not a feature I was looking for.  So I started researching other methods and decided on soaker hoses instead of sprinklers. Soaker hoses help try to prevent the problem of having water sitting on the leaves or base of the roots leading to root rot by letting water seep into the ground rather than spraying the whole plant.  You can even bury soaker hoses in the ground to get them right on the roots.  The packaging recommends covering them with mulch because the sun can degrade them but I haven't gotten around to it and for $12 to replace it I figure buying mulch is more expensive anyways and I'm feeling lazy this season on the mulch front.  If they become clogged you remove the endcap and let the water run through like a normal hose.  Also, they supposedly are great for the environment because you need to use far less water when its soaking in straight at the roots slowly.

I ran one basic garden hose to my front yard and one hose to my backyard vegetable garden bed, and attached to those hoses I have soaker hoses.  The 50' soaker hose I got  cost $12, the two spigot water timer was $40, and regular garden hoses range from about $10-$30 depending on how long of a hose you need before you get to the garden where you place the soaker hose.  So all in all, a relatively inexpensive option to take watering out of the equation and save your plants.

I've tried it out for a few weeks and so far I really like it.  You choose how long you want the timer to water for spigot 1 and spigot 2 (I chose 30 minutes each), how often (I chose every four days), and what time of day (I chose 5:30 a.m. for spigot 1 and 6:00 a.m. for spigot 2).  It has a rain delay function where you simply push + to delay the watering cycle from 12 to I believe 48 hours if it happens to rain and your plants don't need it.  It was very, VERY easy to program and I did it in about 5 minutes.  The only recommendation on the soaker hoses is that they don't lay flat after being packaged in a circle for their whole life because unlike a garden hose they're very lightweight so take them out of the packaging and stretch them flat for a few days if you can before trying to place them.
Soaker hose in raised veggie garden.
Soaker hose running past my strawberries to front garden


The hose to my front garden can run right along the side of the house so there is no problem with mowing.  In the veggie garden however, the hose has about ten feet to go between the side of the house and the actual garden where the soaker hose is placed over my lawn.  Thankfully I tend to mow my own lawn but if you have to run the hose over an area where a landscaper may accidentally shred it with a mower you can put up a small border fence to run with the hose so they have to stop and see that there's a hose.  You can easily disconnect it from the soaker hose so it's not disturbed or lift it up and mow under it quickly.  If you're not using a timer you can always simply leave the soaker hose placed in your garden and attach the garden hose to it each time you want to water.

Here's hoping we get a hot summer so I get a good "test" year in for the soaker hose/water timer experiment!


Friday, May 25, 2012

Last of the plantings (and summary of the garden)

That's right, this past weekend I managed to finally get my veggies fully planted.  My apologies on no pretty pictures, I'll post some when I get back from vacation and have time to fix the picture importer (plus, more fun to post pictures of what the plants look like a week or two after planting).  I gave up on doing brussel sprouts because I didn't have great luck with them last year and I'm already taking on a hell of a lot in the garden.  So what did I do to round out my veggie garden?

Well, I tilled my finally area of the raised bed in back and planted a few sweet potatoes (purchased as little roots from Burpee) in half and the other half I put in zucchini and yellow squash.  I did four seeds of each in the hopes that two of each sprout and I'll thin it out.  I don't have high hopes for the sweet potatoes in the back because it's not very well tilled or fertilized where I planted them, but I basically just wanted to at least try with the leftover roots I have and see what they do.  The best looking roots I put in my potato grow bag from Gardener's.  I've been told that this area isn't hot enough for sweet potatoes but I at least wanted to try it out once.

I also got tomato cages around my tomatoes and planted the row of snacking sunflowers in front of my house.  I'm still torn about if I want to tackle another large project of digging out another 4 feet or so in front of them to plant the pretty white and maroon sunflowers.  I got a bit behind on that project so I'm considering just waiting to do them until I see how well the first row of sunflowers does, especially because these are annuals that I will have to redo all the work year after year.

So in summary, here is all the veggies I'm trying: fairytale eggplant, black beauty eggplant, four tomato varieties, zucchini, yellow squash, sweet pepper, mildly hot pepper, bush beans, rainbow chard, purple carrot, red/white/yellow onions, lettuce, spinach, broccoli, peas, and sweet potatoes.  Fruit I currently have: strawberries, blackberries, blueberries and fruit trees: dwarf lemon, dwarf lime, dwarf pomegranate, dwarf banana.  The fruit trees are doing well but won't produce any fruit this year while they grow since I just got them.  I'll be doing a separate post on them later in the season.

What I did the weekend of 5/12/2012

Alright, my bad.  I've been so busy gardening that actually posting took a bit of a back seat!  May is easily the busiest month for gardening, but keep faith; once you get all your veggies in the garden all you have to do is maintenance for the rest of the summer.  Just work hard now and remember the payoff.

So what did I do the weekend of May12th?  A lot.  I dug out the front area for the first row of sunflowers, which was far harder than it needed to be because I never got around to killing the grass first.  Whoops, lesson learned.  So lots of digging off the top layer of grass and then shoveling and breaking up the clods of dirt to aerate and till the soil.  I had started to put the sod in my yard waste recycling bin but realized they'd be far more useful in my compost bin, so that's where they ended up. 

In the backyard raised bed garden I planted four tomato varieties: Fourth of July (early variety that I got from Burpee), and three randoms that I just picked up from Home Depot.  I also planted my black beauty eggplant from Burpee, and five peppers.  The peppers I mixed up as seedlings so they are a mix of sweet and mildly hot, all from Burpee and all from seeds so I'm excited to see how those do compared against my tomatoes that I bought as plants.  I also tilled and planted broccoli, beans and peas, all from seeds.  The broccoli seeds I used were from last year, so I planted way more than they recommended (twice to three times as many) and thank goodness because only four sprouted.  The peas and beans are sprouting pretty heavily and looking good so far.  So either peas and beans are way easier to grow or the "don't use old seeds" advice I hear from everyone is true.

I also took on some more container gardening and got in one of each type of pepper (but don't know which is which) in some pepper grow bags and a fairy tale eggplant that I got as a plant from Burpee.  I'll post more on these in a Container Gardening Part 2 post.

Both eggplants were looking rather run down by the time I got them in the ground but with some watering and rain they both bounced back well so here's hoping they flourish.

The picture upload isn't working right, but I don't have time to fiddle with it and want to get some posts out before I leave for vacation, so I can't caption but below are: 1. beans, they sprouted up pretty quickly  2.  bed with broccoli and peas  3. five peppers and a black beauty eggplant  4. my fairy tale container eggplant. 


Fairy Tale Eggplant

Wednesday, May 2, 2012

What I'm trying in containers this year-part 1

Well, as all my readers know, I haven't had much success at gardening.  Try as I might at the beginning of the season, by the middle of the season all of my stuff is dead due to neglect, drought, pests, or heaven knows what else.  So I started this blog to try to keep myself accountable and keep track of what I may be doing wrong (or right) so I can do better next time.  All of my prior veggie attempts have been in my backyard garden, so this year one new thing I'm trying is mixing it up by adding some container gardening to compare results.  I'm still waiting on a container eggplant, tomato, sweet potatoes, and for my peppers to grow up a bit, but I realized I'm trying so much in pots this year that I should probably split it into two posts.  So this is the colder weather container gardening I'm doing!  I'll do the other plants in a later post.

Spinach, gourmet, and black seeded lettuce.
Lettuce.  I started this window box at the same time as my seedlings a few weeks ago.  The real goal was to have a small continuous growth of lettuce going year round indoors but I quickly found out that indoors the lettuce was taking FOREVER to grow.  So I moved it outdoors and ta daa, instant salads.  It's a mixture of black seeded simpson, gourmet mix, and baby spinach.  Lettuce you should plant every few weeks during the year because the plants go bitter after a few weeks of maturity (just like us!). 

Peas In-A-Pot.  This is probably the thing I'm most excited about right now; here's the latest photo next to my basil plant at a little under 2 months since planting.  I've never tried peas and they seem to be doing super well!  To get these puppies started I filled the bottom of the pot with about an inch of rocks/pebbles so water drains properly, then about half way with extra topsoil I had, and then finished it off with regular potting soil.  As you can see, a few weeks in they're doing wonderful!  Another thing I've seen on pinterest is putting a coffee filter in the bottom so the soil doesn't drain out when you water the plants.

Strawberries.  I tried these last year and they failed horrible after a few super hot days in a stacking plastic container.  So I went out and got a "true" strawberry pot.  To find out the lack of any special planting I did for these see my prior post on strawberries.  We'll see how these suckers do.  If they all die, I'll be happy to do the special layered PVC pipe ridiculousness, but I'm hoping just 'dirt' will do the trick.

Giant pot of onions and carrots.  I've also never tried onions or carrots so I wanted to test these both in the raised bed AND in a container to see the differences and if they were hard.  So far, all is well in both the container and the garden bed.  With the container I just got the biggest container I could find at Home Depot ($25, what a steal!) and did an inner circle of carrots (the little sprigs there) and an outer ring of 1/3 white, 1/3 red, and 1/3 yellow onions.  As you can see the onions are exploding and the carrots are just liiiiiittle itty bitty in comparison but doing well.
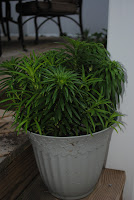
Lilies!

 Also, remember those dead sticks I showed you and how suddenly these little sprouts started appearing out of the pot I pulled them from a few weeks later?  Ta daaaa.  Lilies definitely come back, I'm so excited to see them!  And glad they started sprouting before I decided to re-use the pots!

The great thing about container gardening is that you can move the plant if it's not getting enough sun or is getting too much.  You can also move it closer to the water sources if watering is becoming a problem.  I haven't done it yet on my pots but mulch can be used for container plants too to help them retain moisture.  The only tip I have other than putting a layer of rocks in the bottom before the potting soil (it retains water better than normal dirt) is to do some research on the cost of pots before you just go buy them.  I found that Big Lots was more expensive than Lowe's (shocking) and then that Home Depot was far cheaper than Lowe's, which is usually my go to store.  But the important thing is that even if you're in an apartment you can grow just about anything you want.  There are tons of plants that grow well in containers, and many hybrids from specialty seed companies like Burpee (see my peas in a pot) that are made specifically for containers.  Stay tuned for the post on sweet potatoes, peppers, tomatoes, eggplant, and whatever else I said I was going to do in containers :o)

Monday, April 30, 2012

Plans for Front of House!

Now don't everyone get too excited, because I'm going very ambitious this year, which means I will most likely fall on my face.  The big plan for the front yard this year?  SUNFLOWERS!  I don't know about you but I love sunflowers.  Nothing turns a house into a cozy home faster than these giant monstrosities of awesomeness, which also tend to attract lots of birds.  So my hope is that I'll be sitting on my porch feeling like Snow White all summer with a bluebird army to dress me and mop my floor (or was that Cinderella?).  Anyways, here's the layout.

Closest to the white fence will be normal yellow snacking sunflowers. 

In front of those will alternate between the Chianti Hybrid (a dark maroon) and a white variety called Coconut Ice Hybrid

I've tried sunflowers before, and they didn't even get off the ground.  Literally.  I didn't stake them at all so those stupid giant heads shot up so fast on stalks too skinny to support them and they all fell over.  So now to rectify mistake number one with try number two.  And please, if you've planted sunflowers and know of another glaring noob mistake I'm about to make, please FOR THE SAKE OF THE BIRDIES, let me know.  I got a bunch of 6' tall bamboo stakes with soft fabric ties to try to hold them up as they grow.  I've also heard you can use old pantyhose to tie them.  Don't use anything rigid like zip ties or old sandwich baggie twist ties because if the stalks grow in width and you forget to loosen them it will hurt the plants.  So hopefully this week I'll work on digging out the ground and prepping it so I can get them planted and update this blog with a pretty picture of them starting to grow.

Thursday, April 26, 2012

Sunscreen-The story of the sad wrinkled 29 year old hand.

http://www.californiababy.com
With all the rain we've been having, I haven't been able to get much gardening in.  But I figure it's a good time to remind everyone that one of the most important things for gardeners to keep aware of is the sunlight in your garden.  Sometimes our obsessiveness over the amount of the sun our plants are getting doesn't transfer over to remembering how damaging the sun is to us.  Just want a post to remind everyone to stay safe out there!  And no one looks good crispy crunchy and burnt.  If you're out working in the garden for any amount of time, 15 minutes or all day, you need to be wearing sunscreen.  I have been trying lately to use all natural or non-chemical sunscreens, which tend to not be as pretty because they leave behind a white residue.  Burt's Bees is a very inexpensive one I use on my body, and for my face I'm currently using California Baby SPF.  It's $20 a bottle at Ulta, so not too expensive when using it for your face, and it actually fades very well into my skin with no white residue (warning, Burt's Bees has the residue, that's why I only use it for body).  I use this daily under my makeup and it gives me a nice 'dewey' look but also evens out my complexion by providing a slight sheer coverage.  If I'm not feeling the dewey look and want to go matte I just use foundation powder instead of liquid powder that day and blot with a tissue before applying.

http://www.marykay.com/skincare/agefighting
If you don't like putting sunscreen on your face daily like all the doctors say you should, then you need to look at better brands because there's nothing to not like!  Many out there (even in the non-chemical) glide on and soak in with no residue or gross SPF smell at all.  Go into a Sephora or an Ulta and ask the lovely ladies for help finding a daily sunscreen that isn't offensive, or if you're a lady look for a foundation that includes SPF.  I used to use Mary Kay's Timewise Day Solution SPF 35 and if I switch back to a chemical formula I'll definitely go back to that.  It is a stand alone SPF, not a moisturizer with an SPF, so you can use it with whatever you already use and not be worried about a super greasy, over-moisturized face.  Very light, no smell.

The sad wrinkled hand of a 29 year old.
Back when I wasn't trying to be so eco-friendly I loved the sunscreen sport sticks when I needed something more than daily coverage at the beach or for an all day excursion.  These are so easy to glide on my face and smear in and much more convenient to carry around.  I don't know about everyone else but the sunscreen I disliked the most was ANY spray sunscreen.  Even wiping it in after spraying I still ended up with little spots everywhere and often burned.  Also, whenever you put sunscreen on your face (which should be every day, even in winter) put sunscreen on the backs of your hands!  This is the first body part to show signs of aging and has very sensitive skin that is constantly exposed and we rarely think about protecting. Seriously, look at your hands right now.  They're disgusting, wrinkly, veiny.  Do you really want them to get worse?!?

And lastly, get yourself a nice, big, floppy...hat.  Your hair is not magically transformed into sunscreen just because you can't see your scalp.  And your scalp needs protection.  Not only is it sensitive, but if you do happen to get skin cancer on your scalp it's pretty darn hard to see and diagnose early with all that hair in the way.  Bandannas or a baseball cap are also okay if that's your thing but the floppy hat does double duty of also shading your entire face.  If you have a good hairdresser they are usually on the lookout (I've been sent to the dermatologist by mine) but there's only so much they can see during your bi-monthly visit, particularly if you have dark hair.  Not to mention, there is nothing less attractive than peeling scalp burn that looks like you've got a wicked case of chronic dandruff.  So at least wearing a hat for an hour while you're outdoors will save you from having to wear a hat for a week indoors while your scalp peels away in disgusting, white-flakey fashion.  And I'd like to see you trying to put aloe or "sun relief" on your scalp.  Ew.  Blow drying?  Forget about it.  Date night?  HA.  Hat up.  Just do it.

Postscript:  Yes, this entire post was to make me feel guilty about not using my daily sunscreen in the hopes I stop being a hypocrite and start using it again.   But hopefully I'm also guilt tripping all of you into doing it too.  Anyone have any favorites that they want to clue me in on?  Also, I was going to post a picture of me in a big floppy hat, but who are we kidding, the best I have is a structured cowboy hat.  So it's likely I'll be amending this with a lovely picture of my nasty burn/peel scalp in a few weeks instead :o)  Stay tuned!